Bodycraft BCG 446 Manuel d'utilisateur
Naviguer en ligne ou télécharger Manuel d'utilisateur pour Sports et loisirs Bodycraft BCG 446. BodyCraft BCG 446 User Manual Manuel d'utilisatio
- Page / 19
- Table des matières
- MARQUE LIVRES
Résumé du contenu
Questions?As a quality home gym supplier we are committed to your complete satisfaction. If you have questions, orfind missing or
9STEP 4 ASSEMBLE PEC DEC STATION171617R17R141419191317L939265656532727676919373898986934072909090873133343356565959868986Attach PEC DEC SUPPORT
10STEP 5 ASSEMBLE PRESS STATION1020219376333332326666857188883636555576909090879332323267678674233Insert two 5/8" ID BUSHINGS(66) into T
11T6379806868499090909087T2, T4, T7,T9, T101828749T145a82498720T3, T57575696969694949909090908787T829T1187824995(45a)T1T3T2T4T5T6T7T8T8T9 T10T11T7STEP
12STEP 7 INSTALL PEC DEC CABLE(46a)P1P1P1, P5P2P2P2, P4P4P4P5P5P3P3281417R17L46a12181881828190909087874949Loosely attach pulley P2 and P4 an
13STEP 8 INSTALL LINK CABLE(47a)C1C147a47aP3P3C3C310C2C22982954343498728Insert one eyelet end under P3 and hook on the eyelet end on S
14STEP 9 INSTALL AB CABLEA4T829878249A6C229824987A51828749(94a)A1A1, A23, 11a2A2A3A3A7A5A6A7C2A4T8798080686849499090909090908787878227aInsert eyel
15STEP 10 INSTALL LOWER CABLE(48a)48aL3A349878227aL1L1 L2, L4, L51L6231L2L5 L4L6828287878790834949A3L3Insert eyelet end of LOWER CABLE(48a) t
1616STEP 11 INSTALL ACCESSORIES57576263614343434425585826436051526060606060373737372424244135828282909035353541777777779090535490232221219330a
17STEP 12 INSTALL WEIGHT STACK GUARDS(optional)96969610196a96a96b96b96a96a96b96bAttach WEIGHT STACK GUARD(96) to BASE FRAME(1) and TOP F
18Assembly is complete! Please take the following steps before using the gym:1.2.3.4.5.6.7.Make certain all bolts are tightened securely.Make
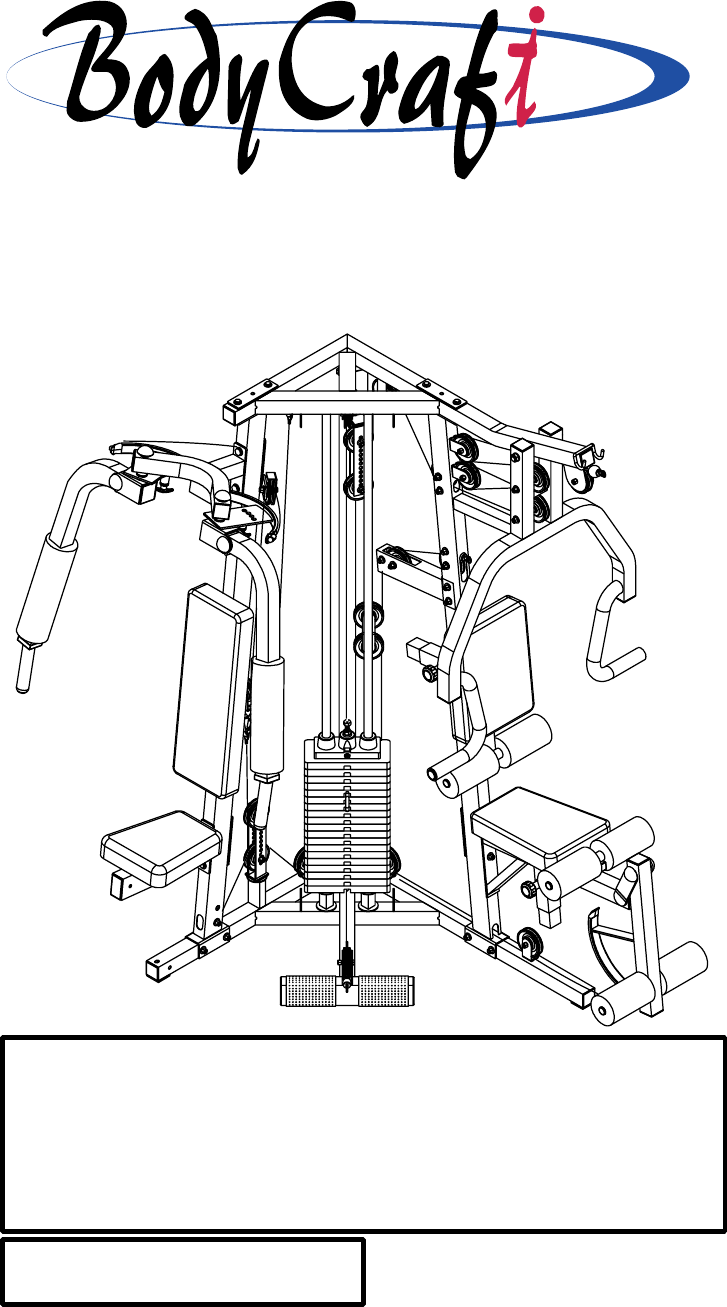
BEFORE YOU BEGINCongratulations and thank you for selecting the BODYCRAFT GALENAstrength training system. The BODYCRAFT GALENA offers an im
1234567891011a12131415161718192021222324252627a282930a313233343536373839404142434445a46a47a48a49501111221911111121122111113111111211434262122141111126
3PARTS CHART(25) (27a)(24) (29) (30a)(28)(22)(21)(23) (11a)(17) (26)(20)(19)(15)(16)(5)(4)(3)(2)(1) (10)(6) (7) (8)(12) (14) (9)(13)(18)
4PARTS CHART(31) (32) (33) (34) (35)(38) (39) (40) (41) (42)(50) (64) (65) (66) (67)(57) (56) (58) (62) (93)(68) (69)(49)(37)(36)(59) (60)(61) (63) (
5PARTS CHART(91)(92)(87) (86) (85)(90) (89) (88)(84)(70)(76)(75)(72)(71)0(inch)1" 2" 3" 4" 5" 6" 7"1/21/4 3/4 1/2
6STEP 1 ASSEMBLE BASE FRAME 1123443278 788787873450 5090 9090 9090909090 90909032848484Attach PEC DEC UPRIGHT(2) to BASE FRAME(1) using tw
7STEP 2 ASSEMBLE WEIGHT STACK1569876470643838Insert 1" ID BUSHING(64) into the holes on BASE FRAME(1), insert GUIDE ROD(5)to 1&q
8STEP 3 ASSEMBLE TOP FRAME234551011a3232909064 64909087878734908739909090908790877884 8484799078Insert two 1" ID BUSHINGS(64) into the
Produits connexes et manuels pour Sports et loisirs Bodycraft BCG 446
 (65 pages)
© 2020, manymanuals.fr. Tous droits réservés | 0.468 s |
 Manymanuals.com
 Manymanuals.de
 Manymanuals.fr
 Manymanuals.it
 Manymanuals.pl
 Manymanuals.cz
 Manymanuals.es
 Manymanuals-pt.com
Commentaires sur ces manuels